INDEX
-
Login
-
Add bookings
-
Filter bookings
-
Add guests to booking
-
Sending to authorities
-
Application settings
Login
The first thing you need to do is download the app directly from the Play Store (Android) or the App Store (iOS). Once you have downloaded the app, open it and log in with the credentials you have set up in Chekin.
If you can't find the app in the Store, you can use one of these download links:

Add bookings
To add a new reservation, you have two options: you can use the blue button in the top-right corner, or you can directly tap on the menu option called “Add reservation.”

This will open the reservation management menu, where you will need to select which property the reservation will be created for, the check-in date, the number of nights for the stay, and the total number of guests.
Once the reservation has been created, you will have the option to add the guest details immediately.

If your account is integrated with a PMS, reservations will appear automatically on the screen without the need to add them manually. However, you also have the option to create reservations manually for bookings that are not managed through a PMS.
Reservations synchronized via iCal will also appear in the app.
Filter bookings
After creating the reservation, you will need to find it in the app in order to add your guest details. To do this, tap on the “Reservations” button in the menu.
In the top-left corner, you will find the filter button, which will open a new menu allowing you to select different filters.
Among the available filters you will find two options:
-
Filter by date
-
Filter by state
The app also allows you to filter by property. To do this, tap on the magnifying glass icon located next to the reservation and date filters.
By tapping on the magnifying glass, you can search for the property whose reservations you want to view. This way, only the reservations for that specific property will be displayed on the screen.
Add guests to booking
Now that you have found your reservation, tap on it to open the menu. This menu offers several options, including copying the link or adding an email address to send the online check-in to your guests.
In this case, we will focus on the scanner and on how to add guests manually.
To add a guest, you can tap on one of the two icons highlighted in red in the image. This will open the guest registration menu.

Note: you also have the option to edit the booking details and delete it in case it has been cancelled.
In this menu you have two options:
-
Fill in the guest data manually.
-
Use the scanner to automatically fill in the form.
To use the scanner you will have to press the "Scan Guest ID" button, as shown in the picture. This will open the camera on your phone which you will need to focus on the MRZ code on the document so that it can detect it and import the data into the form.
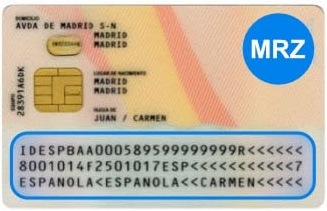
The MRZ code is this series of numbers and digits that appears on the back of the DNI. It appears on almost all official identity cards or passports.
IMPORTANT: if the document does not have MRZ, the app's scanner cannot be used. Data that is not included in the MRZ code, such as names that are too long or the date of issue of the document, will not be downloaded either.
Sending to authorities
After you have registered the guest, in the booking menu you will see the button to send the data to the authorities, you can click on this button to start sending the data at that moment. This can only be done if the check-in date of the reservation has already arrived, as it cannot be done before that date by law.
To see if it has been sent, in the booking tab mentioned above, the bookings will be marked as follows:
-
Complete: the data has been registered.
-
Incomplete: the data is being sent or the guest data has not yet been recorded in the booking.
Application settings
In the settings tab of the app you will find several useful tools:
-
Contact us: opens the chat for you to write a message to the Chekin support team.
-
Help Center: takes you directly to this web page so you can review articles.
-
Go to Dashboard: takes you directly to the Chekin dashboard on your mobile. It opens directly in your browser and appears as if you were on your computer.
-
Change language: you can change the language of the app between English, Spanish or Italian. When you change it, you must restart the app.
-
Log out: allows you to log out of the app.

Did this answer your question?😞😐😃